Integrating with Microsoft Azure Migrate
This will walk you through how to integrate Azure Migrate with Tidal. This integration will sync an inventory of servers that are a part of a Project within your Azure Migrate Portal.
Tutorial
Check out below for a brief video on how to do these steps.
Run the integration
Installation requirements
-
Azure Migrate script from Tidal Gists Repository.
- If
gitis configured, clone the repository with:
- If
git clone https://github.com/tidalmigrations/gists.git
-
Alternatively you can download a copy of the latest file directly from a browser.
- Azure Command-Line Interface (az-cli)
- Tidal Tools.
Authenticate
Login to Azure with the az CLI.
-
Run
az loginand confirm the target subscription is present withaz account show. See image below to find theidof the correct target subscription.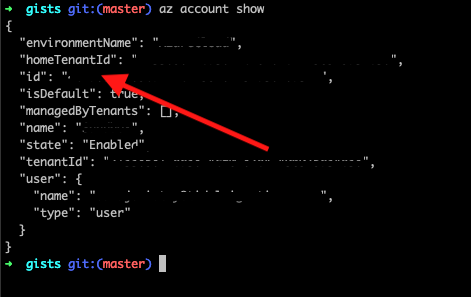
-
Set the default subscription with
az account set --subscription <SUBSCRIPTION_ID>
Configure environment
Next, configure four environment variables used by the integration to connect to your Azure subscription.
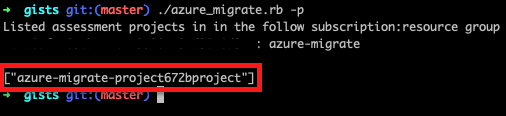
- In the Azure Portal, find the Azure subscription and resource group that the Azure Migrate Project Assessment are located in. Set the
AZ_MIGRATE_SUBSCRIPTIONvariable with the subscription ID and theAZ_MIGRATE_RGvariable with the resource group name. SetAZURE_TOKENvariable with this command:
export AZURE_TOKEN=$(az account get-access-token --query accessToken --output tsv)
Run ./azure_migrate.rb -p and you should see a list of all the Projects in the set subscription and resource group. See image below
- Export this internal project name as
AZ_MIGRATE_PROJECT
In summary the 4 variables to set are:
export AZ_MIGRATE_SUBSCRIPTION=<SUBSCRIPTION_ID>

export AZ_MIGRATE_RG=<RESOURCE_GROUP>

export AZURE_TOKEN=$(az account get-access-token --query accessToken --output tsv)

export AZ_MIGRATE_PROJECT=<ASSESSMENT_PROJECT_MACHINE_NAME>
Execute
Once your environment variables are configured, log in to Tidal Migration Platform using tidal login and authenticate with your Tidal Workspace URL, email and password.
Change directory into the gists repository
cd ./gists
Execute the Azure Migrate export and pipe the servers into Tidal Tools using sync servers
./azure_migrate.rb | tidal sync servers
NOTE:
The azure_migrate.rb script will collect the following data points.
- host_name
- ip_address
- description
- ram_allocated_gb
- storage_allocated_gb
- cpu_count
- virtualization_cluster
- discovery_machine_arm_id
- operating_system_name
- operating_system_type
- operating_system_version
- first_seen (createdTimestamp)
- last_seen (updatedTimestamp)
Review
Once the command succeeds you can navigate to your Tidal Workspace URL at https://my_workspace.tidal.cloud/activity-logs to see the results. Use the left menu bar to navigate to Inventory > Activity Logs where the “Latest job” card should say Sync Servers and have the same timestamp as when the sync servers command succeeded.
This means that tidal sync servers successfully updated your server inventory, as seen in the image below.

View the imported servers that have been from Azure Migrate to this Tidal workspace in the left menu under Assess > Servers. Select an imported server and some compute, virtualization and networking parameters have be pre-populated based on the data in Azure Migrate that was imported into this Tidal workspace.